## 1.头像呼吸光环和鼠标悬停旋转放大  [scode type="share" size="small"]设置方法:后台--外观-设置外观-开发者设置-自定义 CSS[/scode] ``` .img-full { width: 100px; border-radius: 50%; animation: light 4s ease-in-out infinite; transition: 0.5s; } .img-full:hover { transform: scale(1.15) rotate(720deg); } @keyframes light { 0% { box-shadow: 0 0 4px #f00; } 25% { box-shadow: 0 0 16px #0f0; } 50% { box-shadow: 0 0 4px #00f; } 75% { box-shadow: 0 0 16px #0f0; } 100% { box-shadow: 0 0 4px #f00; } } ``` 如果只需要单色呼吸光环,例如红色,可以将关键帧动画改为: ``` @keyframes light { from { box-shadow: 0 0 4px #f00; } to { box-shadow: 0 0 16px #f00; } } ``` ## 2.文章内打赏图标跳动 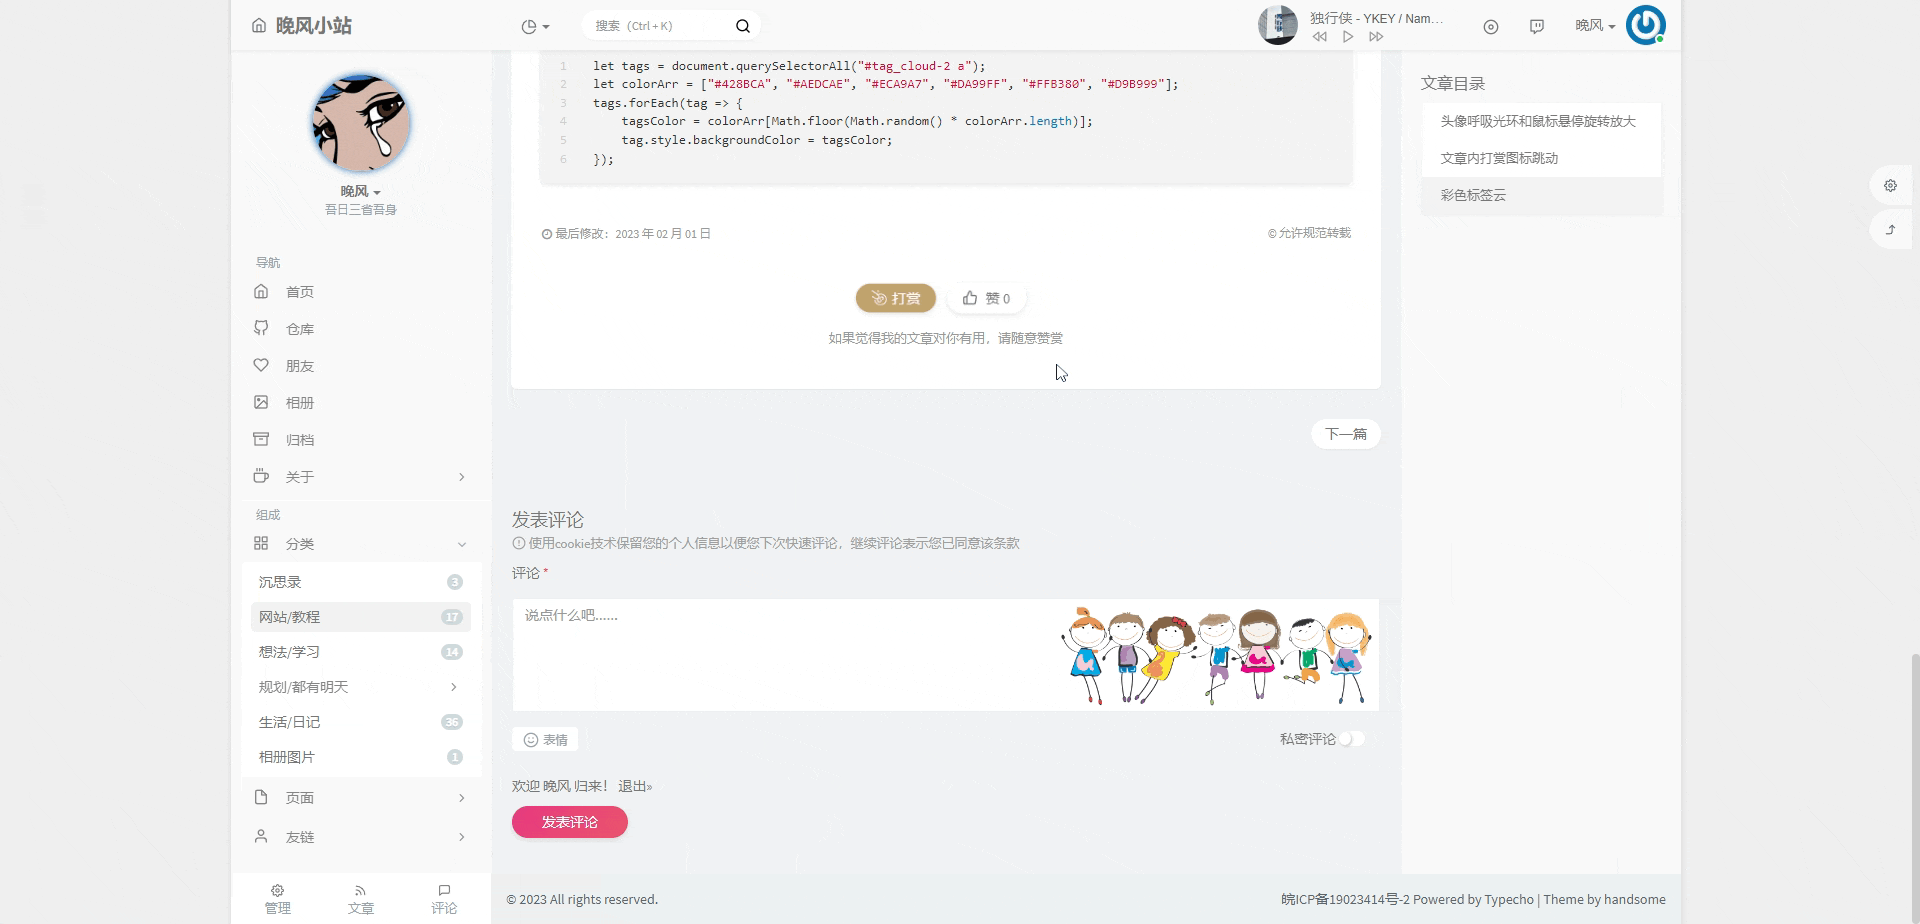 [scode type="share" size="small"]设置方法:后台--外观-设置外观-开发者设置-自定义 CSS[/scode] ``` .btn-pay { animation: star 0.5s ease-in-out infinite alternate; } @keyframes star { from { transform: scale(1); } to { transform: scale(1.1); } } ``` ## 3.彩色标签云 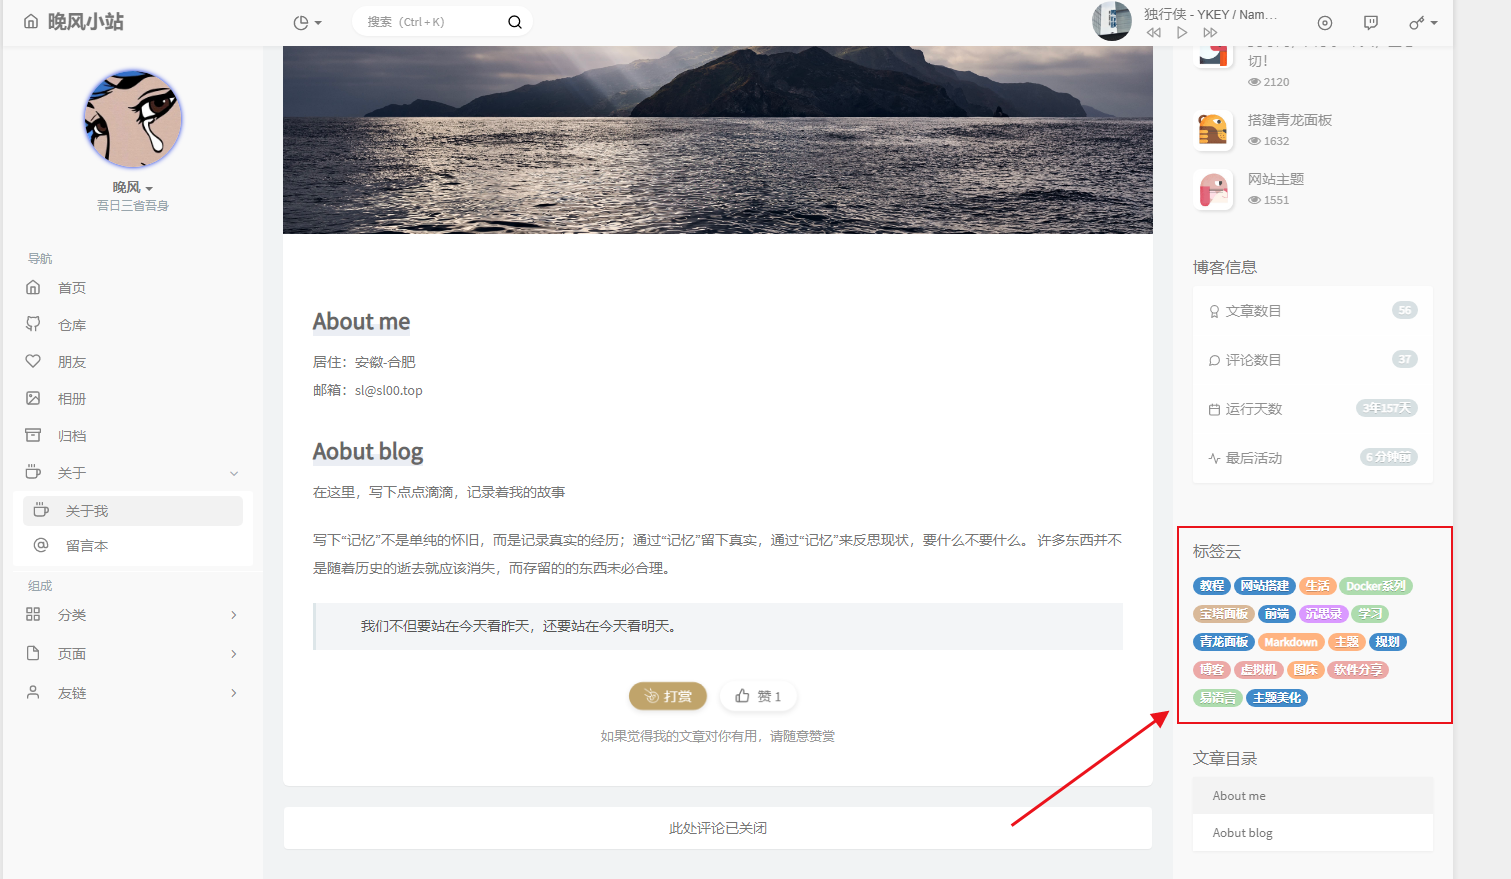 [scode type="share" size="small"]设置方法:后台--外观-设置外观-开发者设置-自定义JavaScript 如果主题中启用了pjax,还需要将上面代码添加到`pjax`回调函数中 设置方法:后台--外观-设置外观-PJAX-PJAX回调函数[/scode] ``` let tags = document.querySelectorAll("#tag_cloud-2 a"); let colorArr = ["#428BCA", "#AEDCAE", "#ECA9A7", "#DA99FF", "#FFB380", "#D9B999"]; tags.forEach(tag => { tagsColor = colorArr[Math.floor(Math.random() * colorArr.length)]; tag.style.backgroundColor = tagsColor; }); ``` 更多样式: ``` <!--纯黑标签云--> let tags = document.querySelectorAll("#tag_cloud-2 a"); let colorArr = ["#000000", "#000000", "#000000", "#000000", "#000000", "#000000"]; tags.forEach(tag => { tagsColor = colorArr[Math.floor(Math.random() * colorArr.length)]; tag.style.backgroundColor = tagsColor; }); <!--银白标签云--> let tags = document.querySelectorAll("#tag_cloud-2 a"); let colorArr = ["#C0C0C0", "#C0C0C0", "#C0C0C0", "#C0C0C0", "#C0C0C0", "#C0C0C0"]; tags.forEach(tag => { tagsColor = colorArr[Math.floor(Math.random() * colorArr.length)]; tag.style.backgroundColor = tagsColor; }); <!--淡蓝标签云--> let tags = document.querySelectorAll("#tag_cloud-2 a"); let colorArr = ["#ADD8E6", "#ADD8E6", "#ADD8E6", "#ADD8E6", "#ADD8E6", "#ADD8E6"]; tags.forEach(tag => { tagsColor = colorArr[Math.floor(Math.random() * colorArr.length)]; tag.style.backgroundColor = tagsColor; }); <!--彩色标签云--> let tags = document.querySelectorAll("#tag_cloud-2 a"); let colorArr = ["#428BCA", "#AEDCAE", "#ECA9A7", "#DA99FF", "#FFB380", "#D9B999"]; tags.forEach(tag => { tagsColor = colorArr[Math.floor(Math.random() * colorArr.length)]; tag.style.backgroundColor = tagsColor; }); <!--天蓝标签云--> let tags = document.querySelectorAll("#tag_cloud-2 a"); let colorArr = ["#00BFFF", "#00BFFF", "#00BFFF", "#00BFFF", "#00BFFF", "#00BFFF"]; tags.forEach(tag => { tagsColor = colorArr[Math.floor(Math.random() * colorArr.length)]; tag.style.backgroundColor = tagsColor; }); ``` ## 4.首页文章列表头图悬停放大并将超出范围隐藏  [scode type="share" size="small"]设置方法:后台--外观-设置外观-开发者设置-自定义 CSS[/scode] ``` .index-post-img { overflow: hidden; } .item-thumb { transition: all 0.3s; } .item-thumb:hover { transform: scale(1.1) } ``` ## 5.页面顶部进度条  [scode type="share" size="small"]设置方法:先在`handsome/component/header.php`文件中最下面添加代码:[/scode] ``` <div class="progress-top" style="position: fixed; top: 0px; height: 5px; background: rgba(31, 159, 199, 0.79); border-radius: 500px; z-index: 5200;"></div> ``` [scode type="share" size="small"]然后下面的代码放到`开发者设置`-`自定义JavaScript`中添加js代码:[/scode] ``` let pageHeight = document.body.scrollHeight || document.documentElement.scrollHeight; let windowHeight = document.documentElement.clientHeight || document.body.clientHeight; let scrollAvail = pageHeight - windowHeight; window.onscroll = function () { let scrollTop = document.documentElement.scrollTop || document.body.scrollTop; document.querySelector('.progress-top').style.width = (scrollTop / scrollAvail) * 100 + '%'; } ``` [scode type="share" size="small"]如果主题中启用了pjax,还需要将上面代码添加到pjax回调函数中 设置方法:后台--外观-设置外观-PJAX-PJAX回调函数[/scode] ## 6.文章标题居中  [scode type="share" size="small"]设置方法:后台--外观-设置外观-开发者设置-自定义 CSS[/scode] ``` .panel h2{ text-align: center; } .post-item-foot-icon{ text-align: center; } ``` ## 7. 美化底部版权  [scode type="share" size="small"]设置方法:后台--外观-设置外观-开发者设置-博客底部左侧信息[/scode] ``` <!--左侧底部--> <div class="github-badge"> <span class="badge-subject">Copyright</span> <a href="https://www.csl88.top/" target="_blank"> <span class="badge-value bg-blue">©2023</span> </a> </div> | <div class="github-badge"> <span class="badge-subject">皖ICP备</span> <a href="http://beian.miit.gov.cn/" target="_blank"> <span class="badge-value bg-green">19023414号-2</span></a> </div> ``` [scode type="share" size="small"]设置方法:后台--外观-设置外观-开发者设置-博客底部右侧信息[/scode] ``` <!--右侧底部--> <div class="github-badge"> <span class="badge-subject">本站由</span> <a href="https://www.aliyun.com/minisite/goods?userCode=bdv09vl7" target="_blank"> <span class="badge-value bg-blue">阿里云提供服务</span></a> </div> | <div class="github-badge"> <span class="badge-subject">Theme by</span> <a href="https://www.ihewro.com/archives/489/" target="_blank"> <span class="badge-value bg-orange">Handsome</span></a> ``` [scode type="share" size="small"]设置方法:后台--外观-设置外观-开发者设置-自定义 CSS[/scode] ``` /*底部页脚css*/ .github-badge { display: inline-block; border-radius: 4px; text-shadow: none; font-size: 12px; color: #fff; line-height: 15px; background-color: #abbac3; margin-bottom: 5px } .github-badge .badge-subject { display: inline-block; background-color: #4d4d4d; padding: 4px 4px 4px 6px; border-top-left-radius: 4px; border-bottom-left-radius: 4px } .github-badge .badge-value { display: inline-block; padding: 4px 6px 4px 4px; border-top-right-radius: 4px; border-bottom-right-radius: 4px } .github-badge .bg-blue { background-color: #007ec6 } .github-badge .bg-orange { background-color: #ffa500 } .github-badge .bg-green { background-color: #3bca6e } ``` 把下面代码放在主题目录`usr/themes/handsome/component/footer.php`内大概在117行,覆盖原来的即可:  ``` <footer id="footer" class="app-footer" role="footer"> <div class="wrapper bg-light"> <span class="pull-right hidden-xs text-ellipsis"> <?php $this->options->BottomInfo(); // 可以去除主题版权信息,最好保留版权信息或者添加主题信息到友链,谢谢你的理解 ?> </span> <span class="text-ellipsis"> <?php $this->options->BottomleftInfo(); ?> </span> </div> </footer> ``` ## 8. 等距离标签 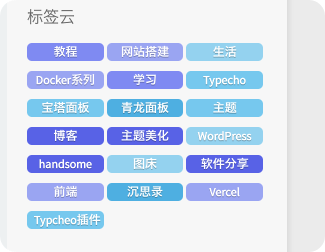 [scode type="share" size="small"]设置方法:后台--外观-设置外观-开发者设置-自定义 CSS[/scode] ``` #tag_cloud-2 a { border-radius: 5px; width: 32%; } ``` 暂时先改这么些,以后有新变动会在添加 > 美化样式参考源于:[Xcnte' s Blog](https://www.xcnte.com/archives/710/),[大西瓜博客](https://bwmelon.com/archives/31/),[Gujiu](https://cloud.tencent.com/developer/article/2184529),[网友小宋](https://xyzbz.cn/archives/830/?replyTo=921), [TuJun's Blog](https://www.5k5b.com/)] > [在线网页gif录制:https://gifcap.dev/](https://gifcap.dev/) > [官方开源地址:https://github.com/joaomoreno/gifcap](https://github.com/joaomoreno/gifcap) ## 以上教程均来自其他博主,本站转载教程仅供个人记录,有兴趣的博友可以访问以上博主站点 Loading... ## 1.头像呼吸光环和鼠标悬停旋转放大  <div class="tip inlineBlock share simple small"> 设置方法:后台--外观-设置外观-开发者设置-自定义 CSS </div> ``` .img-full { width: 100px; border-radius: 50%; animation: light 4s ease-in-out infinite; transition: 0.5s; } .img-full:hover { transform: scale(1.15) rotate(720deg); } @keyframes light { 0% { box-shadow: 0 0 4px #f00; } 25% { box-shadow: 0 0 16px #0f0; } 50% { box-shadow: 0 0 4px #00f; } 75% { box-shadow: 0 0 16px #0f0; } 100% { box-shadow: 0 0 4px #f00; } } ``` 如果只需要单色呼吸光环,例如红色,可以将关键帧动画改为: ``` @keyframes light { from { box-shadow: 0 0 4px #f00; } to { box-shadow: 0 0 16px #f00; } } ``` ## 2.文章内打赏图标跳动  <div class="tip inlineBlock share simple small"> 设置方法:后台--外观-设置外观-开发者设置-自定义 CSS </div> ``` .btn-pay { animation: star 0.5s ease-in-out infinite alternate; } @keyframes star { from { transform: scale(1); } to { transform: scale(1.1); } } ``` ## 3.彩色标签云  <div class="tip inlineBlock share simple small"> 设置方法:后台--外观-设置外观-开发者设置-自定义JavaScript 如果主题中启用了pjax,还需要将上面代码添加到`pjax`回调函数中 设置方法:后台--外观-设置外观-PJAX-PJAX回调函数 </div> ``` let tags = document.querySelectorAll("#tag_cloud-2 a"); let colorArr = ["#428BCA", "#AEDCAE", "#ECA9A7", "#DA99FF", "#FFB380", "#D9B999"]; tags.forEach(tag => { tagsColor = colorArr[Math.floor(Math.random() * colorArr.length)]; tag.style.backgroundColor = tagsColor; }); ``` 更多样式: ``` <!--纯黑标签云--> let tags = document.querySelectorAll("#tag_cloud-2 a"); let colorArr = ["#000000", "#000000", "#000000", "#000000", "#000000", "#000000"]; tags.forEach(tag => { tagsColor = colorArr[Math.floor(Math.random() * colorArr.length)]; tag.style.backgroundColor = tagsColor; }); <!--银白标签云--> let tags = document.querySelectorAll("#tag_cloud-2 a"); let colorArr = ["#C0C0C0", "#C0C0C0", "#C0C0C0", "#C0C0C0", "#C0C0C0", "#C0C0C0"]; tags.forEach(tag => { tagsColor = colorArr[Math.floor(Math.random() * colorArr.length)]; tag.style.backgroundColor = tagsColor; }); <!--淡蓝标签云--> let tags = document.querySelectorAll("#tag_cloud-2 a"); let colorArr = ["#ADD8E6", "#ADD8E6", "#ADD8E6", "#ADD8E6", "#ADD8E6", "#ADD8E6"]; tags.forEach(tag => { tagsColor = colorArr[Math.floor(Math.random() * colorArr.length)]; tag.style.backgroundColor = tagsColor; }); <!--彩色标签云--> let tags = document.querySelectorAll("#tag_cloud-2 a"); let colorArr = ["#428BCA", "#AEDCAE", "#ECA9A7", "#DA99FF", "#FFB380", "#D9B999"]; tags.forEach(tag => { tagsColor = colorArr[Math.floor(Math.random() * colorArr.length)]; tag.style.backgroundColor = tagsColor; }); <!--天蓝标签云--> let tags = document.querySelectorAll("#tag_cloud-2 a"); let colorArr = ["#00BFFF", "#00BFFF", "#00BFFF", "#00BFFF", "#00BFFF", "#00BFFF"]; tags.forEach(tag => { tagsColor = colorArr[Math.floor(Math.random() * colorArr.length)]; tag.style.backgroundColor = tagsColor; }); ``` ## 4.首页文章列表头图悬停放大并将超出范围隐藏  <div class="tip inlineBlock share simple small"> 设置方法:后台--外观-设置外观-开发者设置-自定义 CSS </div> ``` .index-post-img { overflow: hidden; } .item-thumb { transition: all 0.3s; } .item-thumb:hover { transform: scale(1.1) } ``` ## 5.页面顶部进度条  <div class="tip inlineBlock share simple small"> 设置方法:先在`handsome/component/header.php`文件中最下面添加代码: </div> ``` <div class="progress-top" style="position: fixed; top: 0px; height: 5px; background: rgba(31, 159, 199, 0.79); border-radius: 500px; z-index: 5200;"></div> ``` <div class="tip inlineBlock share simple small"> 然后下面的代码放到`开发者设置`-`自定义JavaScript`中添加js代码: </div> ``` let pageHeight = document.body.scrollHeight || document.documentElement.scrollHeight; let windowHeight = document.documentElement.clientHeight || document.body.clientHeight; let scrollAvail = pageHeight - windowHeight; window.onscroll = function () { let scrollTop = document.documentElement.scrollTop || document.body.scrollTop; document.querySelector('.progress-top').style.width = (scrollTop / scrollAvail) * 100 + '%'; } ``` <div class="tip inlineBlock share simple small"> 如果主题中启用了pjax,还需要将上面代码添加到pjax回调函数中 设置方法:后台--外观-设置外观-PJAX-PJAX回调函数 </div> ## 6.文章标题居中  <div class="tip inlineBlock share simple small"> 设置方法:后台--外观-设置外观-开发者设置-自定义 CSS </div> ``` .panel h2{ text-align: center; } .post-item-foot-icon{ text-align: center; } ``` ## 7. 美化底部版权  <div class="tip inlineBlock share simple small"> 设置方法:后台--外观-设置外观-开发者设置-博客底部左侧信息 </div> ``` <!--左侧底部--> <div class="github-badge"> <span class="badge-subject">Copyright</span> <a href="https://www.csl88.top/" target="_blank"> <span class="badge-value bg-blue">©2023</span> </a> </div> | <div class="github-badge"> <span class="badge-subject">皖ICP备</span> <a href="http://beian.miit.gov.cn/" target="_blank"> <span class="badge-value bg-green">19023414号-2</span></a> </div> ``` <div class="tip inlineBlock share simple small"> 设置方法:后台--外观-设置外观-开发者设置-博客底部右侧信息 </div> ``` <!--右侧底部--> <div class="github-badge"> <span class="badge-subject">本站由</span> <a href="https://www.aliyun.com/minisite/goods?userCode=bdv09vl7" target="_blank"> <span class="badge-value bg-blue">阿里云提供服务</span></a> </div> | <div class="github-badge"> <span class="badge-subject">Theme by</span> <a href="https://www.ihewro.com/archives/489/" target="_blank"> <span class="badge-value bg-orange">Handsome</span></a> ``` <div class="tip inlineBlock share simple small"> 设置方法:后台--外观-设置外观-开发者设置-自定义 CSS </div> ``` /*底部页脚css*/ .github-badge { display: inline-block; border-radius: 4px; text-shadow: none; font-size: 12px; color: #fff; line-height: 15px; background-color: #abbac3; margin-bottom: 5px } .github-badge .badge-subject { display: inline-block; background-color: #4d4d4d; padding: 4px 4px 4px 6px; border-top-left-radius: 4px; border-bottom-left-radius: 4px } .github-badge .badge-value { display: inline-block; padding: 4px 6px 4px 4px; border-top-right-radius: 4px; border-bottom-right-radius: 4px } .github-badge .bg-blue { background-color: #007ec6 } .github-badge .bg-orange { background-color: #ffa500 } .github-badge .bg-green { background-color: #3bca6e } ``` 把下面代码放在主题目录`usr/themes/handsome/component/footer.php`内大概在117行,覆盖原来的即可:  ``` <footer id="footer" class="app-footer" role="footer"> <div class="wrapper bg-light"> <span class="pull-right hidden-xs text-ellipsis"> <?php $this->options->BottomInfo(); // 可以去除主题版权信息,最好保留版权信息或者添加主题信息到友链,谢谢你的理解 ?> </span> <span class="text-ellipsis"> <?php $this->options->BottomleftInfo(); ?> </span> </div> </footer> ``` ## 8. 等距离标签  <div class="tip inlineBlock share simple small"> 设置方法:后台--外观-设置外观-开发者设置-自定义 CSS </div> ``` #tag_cloud-2 a { border-radius: 5px; width: 32%; } ``` 暂时先改这么些,以后有新变动会在添加 > 美化样式参考源于:[Xcnte' s Blog](https://www.xcnte.com/archives/710/),[大西瓜博客](https://bwmelon.com/archives/31/),[Gujiu](https://cloud.tencent.com/developer/article/2184529),[网友小宋](https://xyzbz.cn/archives/830/?replyTo=921), [TuJun's Blog](https://www.5k5b.com/)] > [在线网页gif录制:https://gifcap.dev/](https://gifcap.dev/) > [官方开源地址:https://github.com/joaomoreno/gifcap](https://github.com/joaomoreno/gifcap) ## 以上教程均来自其他博主,本站转载教程仅供个人记录,有兴趣的博友可以访问以上博主站点 最后修改:2026 年 06 月 16 日 © 允许规范转载 打赏 赞赏作者 支付宝微信 赞 9 如果觉得我的文章对你有用,请随意赞赏

1 条评论
博主太厉害了!